Petri,Feathering & other Effects with Alcohol Ink
Mica or Pigment Paste in Resin
Exploring Unique Resin Effects
Some people use the term petri effect when using all alcohol inks in resin. And when switching out the white alcohol ink instead to a white epoxy paste, some people refer to that as the feather, swirl, or cloud effect. There are also examples below of getting similar unique effects without using any alcohol inks. There are many ways to create fun depth in resin using alcohol inks, pigments, and different ways to manipulate them once in the moulds.
Learning by Doing: Experimentation is Key
The best way to learn is to start playing. You may need to experiment many times with different amounts of ink drops in your resin, but it’s important never to add too much ink. All resins behave differently, so you’ll only understand their quirks by testing them. Experiment with small projects first to observe how your resin reacts to pigments in your specific environment (temperature, humidity, etc.). Artists go through extensive trial and error to master these techniques.
Resin Viscosity: Finding the Sweet Spot
Some people find medium-low viscosity resin (medium viscosity can be thinned by pre-warming) works best for these effects. If your resin is very thin (water-like), let it sit in the mould for 1–2 hours before adding inks. High-viscosity resins (thick consistency) often struggle with these techniques. There’s no universal formula—results depend on your resin brand, studio temperature, humidity, and pigments.
Troubleshooting Common Issues
- White Blobs/Sinking Pigments
White pigment (the heaviest) often forms blobs at the mould’s bottom. While these were once part of the “petri charm,” many now prefer cleaner results. Causes include:- Too much pigment or cold resin.
- Solutions: Warm resin slightly, reduce white pigment, or embrace subtle blobs as part of the design.
- Uncured or Mushy Resin
Overloading with alcohol inks/pigments can disrupt the resin’s chemical balance, leading to improper curing. Always start with minimal pigment and gradually increase as you refine your technique.
Final Tips for Success
- Embrace imperfection: Random blobs or swirls add organic charm.
- Document experiments: Track ratios, temperatures, and outcomes to build your personal “recipe book.”
- Respect material limits: Never exceed recommended pigment/resin ratios.
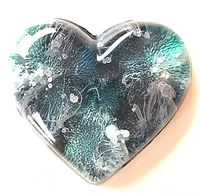
Alcohol Inks in Resin
(White alcohol ink diluted with 99% isopropyl alcohol for these 9 hearts.)
It’s been 4 years since I used these techniques, but the results remain fascinating. The resin had medium-low viscosity. I experimented without letting it sit in moulds first—added inks within 10 minutes. Resin temp: 80°F mixed, 77-78°F in moulds.
Process for the 9 Hearts:
- First Layer: 1 drop colored alcohol ink per section.
- Second Layer: 1 drop diluted white ink (Blanco white + 70% alcohol) over colored drops.
- Repeat: Alternate color and white ink drops.
- Swirl: Use a toothpick to blend; wipe after each swirl to avoid mould scratches.
Dilution Notes:
- Tested 30% white ink + 70% alcohol (too weak). Next try: 50/50 mix.
- Alternative method for clouds: 50 white ink drops per 1 oz resin.
Prior Failed Test:
Used undiluted white ink in a ring mould—too heavy, caused mushy residue. Adjusted by diluting for heart project.
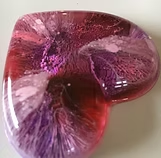
Alcohol inks in resin (with white alcohol ink not diluted).
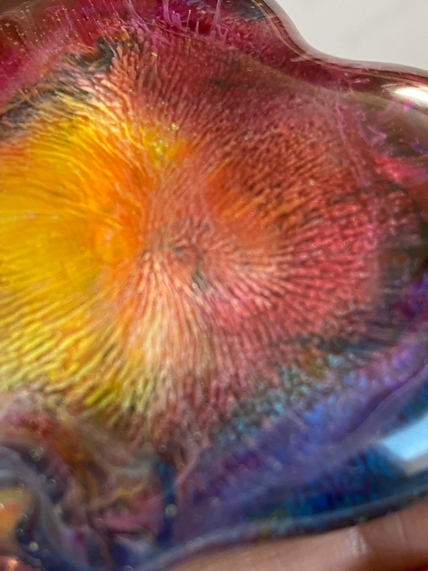
The white ink had no isopropyl alcohol added. The previously used resin formulation is no longer available, but it was very thin (like water) consistency, so I had to let the resin sit in the moulds for about two hours (to allow viscosity to thicken a bit), before I could drop the inks. I did not swirl these after dropping the inks. I didn’t use much white, and I left negative space, because I like seeing through the resin. The resin formulation, is what I would try next for this effect.
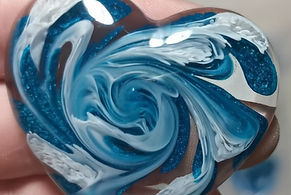
Here are a few of the hearts, the same way as mentioned in the coasters coaster above.
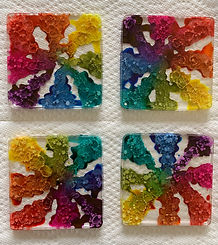
This set of coasters I made with everything the same as above coasters But here I used a medium viscosity resin. So the effect was not as desirable as previous set. I hope to try this with a warmed up topcoating epoxy soon, and casting epoxy. I’ll post my results here when I do.
Some people really dislike working with alcohol inks. From what I have noticed, it’s often because the type of ink can effect the finish. Also alcohol inks are not light fast, so they can fade, and some people found they faded fast.
Below, you will see a few other methods to get unique texture designs in resin. And you don’t necessarily need always need alcohol inks to achieve these fun textured depth looks. Mica will not achieve the same look as alcohol inks, but it will add a pearlescent or other shiny effect in the areas it sits. Epoxy pigment pastes mixed with resin will work great.
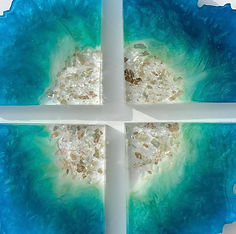
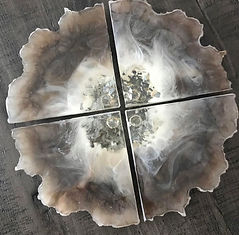
Pigment Coloured Resin added to Clear Resin in moulds (no alcohol inks used in examples below).

These coasters instead of using alcohol inks, I used various pigments in resin. I poured clear resin into the moulds first. Then added lines of pigmented (some mica, some epoxy paste) resin. Then added the white which was a pigment paste mixed with resin (I just used a paper cup squeezed into spout shape to pour the lines).Then manipulated designs using a toothpick.

For floral and other patterns using similar mediums above, many people find it easier to get more control, by pouring the white coloured resin using a piping (icing type) bag (or ziplock bag), instead of pouring from a cup, in to the mould. Then use a toothpick or silicone tip brush, to manipulate into a floral or other pattern.
Remember to wipe off the tip (of manipulating tool) each time you pull it out of the resin, before using in next mould. And be careful not to drip on other pieces before wiping the tool.
Some people find the medium to low viscosity works for these floral coasters, so you can use the iCoat Medium Viscosity, but warm the bottles up to about 82℉ prior to mixing. Use a digital thermometer so you’re not guessing. If bottles get to warm, leave lids off and let cool prior to mixing.
The Resin Feathering Technique, is another popular term some people use for similar effects with these mediums.
There are also some artists, who have used another version mixing these colour mediums (alcohol inks and/or pigments), for varying effects in resin.
You can add a bit of 99% isopropyl alcohol to your pigment coloured resins or, just the white paste coloured resin. Lots of experimenting (trial and error), created many cool versions of this technique/style, to get varying results.