How to Color UV Resin for Stunning Results
Coloring UV resin unlocks endless opportunities for crafting unique and eye-catching creations. This adaptable material lets you design jewelry, decorative pieces, and even preserve keepsakes with a sleek, professional finish. By applying the right methods and materials, you can achieve bold colors, sparkling effects, or delicate transparency. Whether you’re new to crafting or a seasoned expert, experimenting with craft UV resin can help bring your artistic ideas to reality.
Key Takeaways
- Gather essential materials like high-quality UV epoxy resin, a UV light source, and compatible colorants to ensure successful crafting.
- Choose the right colorants—mica powders for shimmer, alcohol inks for transparency, and resin-specific pigments for bold colors—to achieve desired effects.
- Create a safe and organized workspace by using protective gear, ensuring proper ventilation, and keeping food and drinks away from your crafting area.
- Test your colored resin mixture on a small surface before applying it to your main project to ensure the desired color and curing results.
- Avoid common mistakes such as using incompatible colorants or excessive pigment, which can lead to uneven curing and poor finishes.
- Experiment with layering colors and adding creative elements like glitter or dried flowers to enhance the visual appeal of your resin projects.
- Prioritize safety by wearing protective gear and handling UV resin carefully to enjoy a worry-free crafting experience.
Materials You Need to Color UV Resin
Creating vibrant and unique designs with UV epoxy resin starts with gathering the right materials. Having the proper tools and supplies ensures a smooth crafting process and stunning results. Let’s dive into what you’ll need.
Essential Tools and Supplies
To get started, you’ll need a few basic tools and supplies. These items make working with UV epoxy resin easier and help you achieve professional-quality results:
- UV epoxy resin: Choose a high-quality resin like UV Crystal Resinfor its clarity and durability.
- UV light source: A UV lamp or flashlight is essential for curing the resin quickly and evenly.
- Mixing tools: Use silicone or disposable stir sticks to mix your resin and colorants without creating bubbles.
- Measuring cups: Small, clear cups help you measure precise amounts of resin and colorants.
- Protective gear: Gloves and a mask protect your skin and lungs from resin exposure.
Having these essentials on hand sets you up for success and keeps your workspace organized.
Recommended Colorants for Craft UV Resin
The right colorants can transform your craft UV resin into a masterpiece. Not all pigments work well with resin, so it’s important to choose compatible options. Here are some popular choices:
- Mica powders: These powders add a shimmery, metallic effect to your resin. They’re perfect for creating eye-catching jewelry or decorative pieces.
- Alcohol inks: These inks provide vibrant, transparent colors. They’re ideal for achieving a stained-glass look or subtle gradients.
- Resin-specific pigments: Designed specifically for resin, these pigments offer bold, opaque colors without affecting the curing process.
Using high-quality colorants ensures even dispersion and prevents issues like uneven curing or dull finishes.
Optional Additions for Creative Effects
If you want to take your designs to the next level, consider adding creative elements to your resin. These optional additions can make your projects truly stand out:
- Glitter: Add sparkle and shine to your resin creations with fine or chunky glitter.
- Metallic flakes: Gold, silver, or copper flakes create a luxurious, textured look.
- Dried flowers: Encasing flowers in resin preserves their beauty and adds a natural touch.
- UV colors: Products like UV colorsare perfect for adding vibrant hues to small items or jewelry.
Experimenting with these extras allows you to customize your designs and explore endless possibilities.
Preparing Your Workspace for Crafting with UV Resin
Creating a safe and organized workspace is essential when working with UV epoxy resin. A well-prepared area not only ensures better results but also keeps you protected from potential hazards. Let’s explore how to set up your crafting space effectively.
Setting Up a Safe and Clean Workspace
Safety should always come first when working with UV resin. This material can release fumes and cause skin irritation, so taking precautions is crucial. Follow these steps to create a safe environment:
- Wear protective gear: Always use nitrile glovesto shield your hands and a respirator mask to avoid inhaling fumes. UV-protective eyewear is also a must to guard your eyes during curing.
- Use a non-porous surface: Work on a surface that’s easy to clean, like silicone mats or glass sheets. These materials prevent resin from sticking and make cleanup simple.
- Keep food and drinks away: Avoid contamination by keeping your workspace free of food and beverages. This reduces the risk of accidental ingestion of resin particles.
By prioritizing safety, you can focus on your creativity without worrying about health risks.
Organizing Materials and Tools
An organized workspace makes crafting more enjoyable and efficient. When everything is within reach, you can concentrate on your project instead of searching for supplies. Here’s how to stay organized:
- Sort your tools: Keep mixing sticks, measuring cups, and colorants in separate containers. Label them for quick identification.
- Use storage solutions: Store your resin and additives in airtight containers to prevent spills and contamination. A small toolbox or drawer organizer works well for this purpose.
- Designate a crafting zone: Dedicate a specific area for your resin projects. This helps you maintain focus and keeps other parts of your home clean.
A tidy workspace not only saves time but also enhances your overall crafting experience.
Ensuring Proper Ventilation and Lighting
Good ventilation and lighting are key to working comfortably and safely with UV resin. Poor airflow can lead to fume buildup, while inadequate lighting may cause mistakes. Here’s how to optimize your workspace:
- Improve airflow: Open windows or use an exhaust fan to vent fumes outof the room. If possible, work near a window with a fan pointing outward to ensure fresh air circulation.
- Invest in proper lighting: Use bright, natural light or LED lamps to illuminate your workspace. This helps you see details clearly and prevents eye strain.
- Position your UV light carefully: Place your UV lamp in a stable spot where it won’t accidentally cure resin before you’re ready.
By ensuring proper ventilation and lighting, you create a comfortable and safe environment for your projects.
Preparing your workspace might seem like a small step, but it has a big impact on your crafting success. A safe, clean, and organized area allows you to focus on creating stunning resin designs while protecting your health.
Step-by-Step Guide to Coloring UV Resin
Coloring UV epoxy resin can feel like a creative adventure. By following these steps, you’ll achieve vibrant, professional-looking results while avoiding common pitfalls. Let’s dive into the process.
Step 1: Preparing the Resin
Start by preparing your UV epoxy resin. Pour the desired amount into a clean, dry mixing cup. Make sure the resin is free from dust or debris, as even small particles can affect the final look. Use a silicone or disposable stir stick to gently stir the resin for a few seconds. This helps release any trapped air bubbles and ensures a smooth base for adding color.
Keep in mind that UV resin cures quickly under UV light, so work in a shaded area to prevent premature hardening. If you’re using craft UV resin for the first time, start with a small batch to practice your technique.
Step 2: Adding and Mixing Colorants
Now comes the fun part—adding color! Choose a colorant that works well with UV resin. Popular options include mica powders, alcohol inks, and resin-specific pigments. These colorants disperse evenly and won’t interfere with the curing process.
Here’s how to add and mix your colorant:
- Start small: Add a tiny amount of colorant to the resin. You can always add more, but removing excess color is impossible.
- Mix thoroughly: Stir the resin and colorant together using a slow, circular motion. This prevents air bubbles and ensures an even color.
- Check consistency: Look for a smooth, streak-free mixture. If you’re using mica powder, make sure it’s fully dissolved to avoid clumps.
Experiment with different colorants to see how they interact with the resin. For example, mica powders create a shimmering effect, while alcohol inks produce vibrant, translucent hues. Soap dyes and UV resin dyes also work well for adding bold colors.
Step 3: Testing and Adjusting the Mixture
Before committing to your design, test the colored resin. Place a small drop on a piece of wax paper or a silicone mat. Cure it under a UV light for a few seconds to see how the color looks when hardened. This step helps you identify any issues, such as uneven mixing or unexpected color changes.
If the color isn’t quite right, adjust the mixture:
- Too light?Add a tiny bit more colorant and mix again.
- Too dark?Dilute the mixture by adding more clear resin.
- Uneven?Stir the resin thoroughly to ensure the colorant is fully incorporated.
Testing also allows you to check the curing process. Some pigments, like mica powders, can block UV light if used in excess. If the resin doesn’t cure properly, reduce the amount of pigment and try again.
Once you’re happy with the color and consistency, you’re ready to move on to the next steps in your project. Whether you’re creating jewelry, coasters, or decorative art, this preparation sets the stage for stunning results.
Step 4: Curing the Resin Under UV Light
Curing your UV resin is the final and most crucial step in the process. This step locks in the color and ensures your creation is durable and polished. To achieve the best results, you need to follow a few key practices.
Positioning Your Resin for Curing
Place your resin piece on a flat, stable surface. Ensure it’s free from dust or debris that could stick to the resin during curing. If you’re working with small items like jewelry, use a silicone mat or a non-stick surface to keep them in place. This prevents movement and ensures an even cure.
Using the UV Light Source Effectively
Your UV light source plays a vital role in curing. Whether you’re using a UV lamp or flashlight, proper positioning and timing are essential. Follow these steps for optimal curing:
- Position the light: Hold or place the UV light about 2–4 inches above the resin surface. This distance allows the light to penetrate evenly.
- Cure in intervals: Start with short bursts of light, around 30 seconds, to set the resin. Then, continue curing for 2–4 minutes, depending on the thickness of your piece.
- Flip if needed: For thicker or double-sided designs, flip the piece halfway through and cure the other side.
Keep in mind that thicker layers may require additional curing time. Thin layers cure faster and more evenly, so consider layering your resin if you’re working on a larger project.
Checking for Complete Curing
After curing, inspect your resin to ensure it’s fully hardened. Gently touch the surface with a gloved finger. It should feel firm and non-tacky. If it’s still soft or sticky, cure it for another minute or two under the UV light.
Troubleshooting Common Curing Issues
Sometimes, curing doesn’t go as planned. Here’s how to address common problems:
- Sticky or soft resin: This often happens when too much pigment blocks the UV light. Reduce the amount of colorant in your next batch and cure in thinner layers.
- Uneven curing: Ensure the UV light covers the entire surface evenly. Rotate the piece or adjust the light’s position if needed.
- Bubbles in the resin: These can appear if the resin wasn’t mixed properly. Use a heat gun or torch before curing to remove bubbles.
By following these steps, you’ll achieve a smooth, professional finish that highlights the vibrant colors and effects you’ve worked so hard to create. Curing might seem like a simple step, but it’s the key to turning your resin project into a stunning masterpiece.
Best Colorants for Craft UV Resin
Choosing the right colorants can transform your UV epoxy resin projects into stunning works of art. Each type of colorant offers unique effects, allowing you to customize your creations to match your vision. Let’s explore some of the best options for coloring craft UV resin.
Mica Powders for Shimmery Effects
Mica powders are a favorite among resin crafters for their ability to add a luxurious shimmer. These fine, mineral-based powders come in a wide range of colors, from soft pastels to bold metallics. When mixed with UV epoxy resin, mica powders create a pearlescent effect that catches the light beautifully.
To use mica powders, sprinkle a small amount into your resin and mix thoroughly. The powder disperses evenly, giving your project a smooth, glittery finish. You can layer different colors to create depth or blend them for a custom shade. For example, combining gold and silver mica powders can produce a festive, sparkling effect perfect for holiday ornaments or jewelry.
Keep in mind that using too much mica powder can block UV light, preventing the resin from curing properly. Start with a small amount and gradually add more until you achieve the desired intensity.
Alcohol Inks for Transparent Finishes
Alcohol inks are another excellent choice for coloring craft UV resin. These highly pigmented inks create vibrant, transparent finishes that resemble stained glass. They’re perfect for projects where you want to achieve a bold yet see-through look.
To use alcohol inks, add a few drops to your resin and stir gently. The ink spreads quickly, so a little goes a long way. You can also experiment with techniques like swirling or layering to create unique patterns. For instance, adding multiple colors and swirling them together can mimic the look of marble or tie-dye.
Alcohol inks work well for projects like coasters, keychains, or decorative art. Their vibrant colors make them a popular choice for creating eye-catching designs.
Resin-Specific Pigments for Versatility
Resin-specific pigments are specially formulated to work with UV epoxy resin. These pigments come in both liquid and paste forms, offering a wide range of colors and finishes. They’re versatile and easy to use, making them a go-to option for beginners and experienced crafters alike.
Liquid pigments blend seamlessly with resin, providing even color distribution. They’re great for achieving bold, opaque finishes without affecting the curing process. Paste pigments, on the other hand, offer a thicker consistency and more intense color. They’re ideal for projects where you want maximum coverage and vibrancy.
To use resin-specific pigments, add a small amount to your resin and mix until fully incorporated. You can adjust the intensity by adding more pigment or diluting it with clear resin. These pigments are perfect for creating everything from jewelry to larger decorative pieces.
Whether you’re crafting a shimmering ornament or a vibrant piece of art, these colorants provide endless possibilities. Experiment with different types to discover what works best for your projects.
Achieving Specific Effects with UV Resin
When working with UV epoxy resin, you can create stunning effects that elevate your projects to the next level. Whether you want a sleek transparent finish, layered depth, or dazzling accents, mastering these techniques will help you achieve professional results. Let’s explore how you can bring your creative vision to life.
Creating Transparent or Opaque Finishes
The finish of your resin project plays a big role in its overall look. You can choose between a transparent or opaque finish depending on the style you want to achieve.
To create a transparent finish, use colorants like alcohol inks sparingly. These inks blend seamlessly with resin and maintain its clarity. Add just a drop or two to your resin and mix thoroughly. This technique works well for projects like stained-glass-inspired art or delicate jewelry pieces. Transparent finishes allow light to pass through, giving your creations a luminous, airy feel.
For an opaque finish, opt for resin-specific pigments or mica powders. These colorants provide rich, solid colors that completely cover the resin. Start with a small amount of pigment and gradually add more until you reach the desired opacity. Opaque finishes are perfect for bold designs, such as statement jewelry or decorative coasters. Mica powders, in particular, add a luxurious shimmer to opaque designs, making them stand out even more
 DIY Beeswax Candles: Complete Beginner Guide
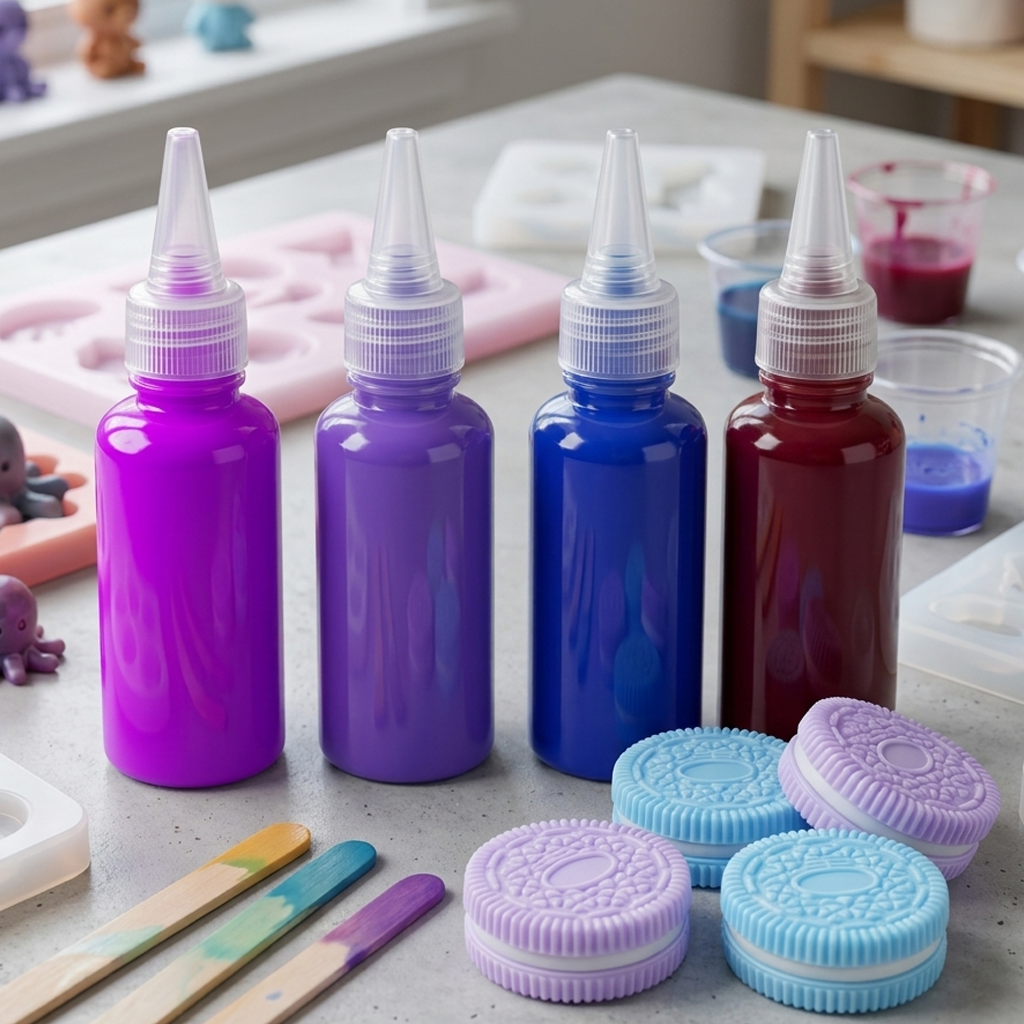 How Much Silicone Pigment Should Be Added to Silicone?
 Discover Amazing Candle-Making Colors: Best Hues & Waxes